
Rsync for Windows
This guide is aimed at those who wish to use Rsync to backup M$ Windows based machines to Linux Servers or to other Windows Workstations/Servers. This guide is super-old and has not been tested on any of the latest Windows Server versions. Use at your own risk!
Set out below are three sections detailing the setup of the Cygwin software, the set up of the Server (daemon) side and the Client side of Rsync.
Before you get carried away: Please note that the packets sent between the client and the server on port 873 are not encrypted. If you are planning to use this method to back-up Windows based systems via the Internet it is advisable to research the use of SSH before you start. See here for a useful guide to using Rsync with stunnel.
If you have a Linux server on-site, it may be advisable to use CIFS mounts to your Windows systems, then use Rsync over SSH to back-up the data.
1: Cygwin
Before you can use Rsync on a Windows Workstation or Windows Server, you will need to download and install the Cygwin system, with the following selections as a minimum:
(1.1) +Editors Install nano for use as a simple text editor (or install one of the others if you are familiar with them), as in the following example screen.
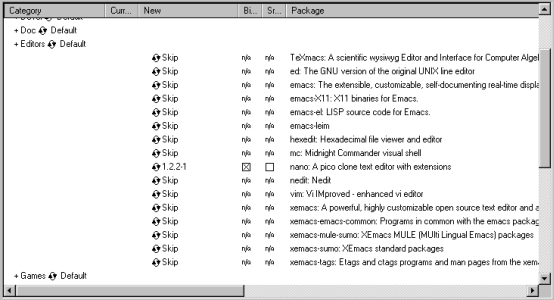 |
| Click +Editors to expand the choices, then select nano. |
(1.2) +Net Install Rsync as in the following example screen. (It is not installed by default and might be useful for this exercise!)
 |
| Click +Net to expand the choices, then select Rsync. |
(1.3) +Admin If you are planning to use Rsync as a Service under Windows, you must expand the +Admin section and select cygrunsrv NT/W2k service initiator.
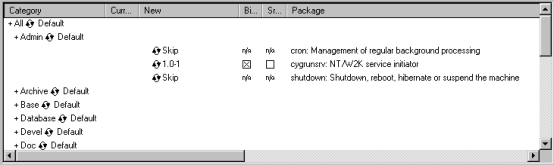 |
| Click +Admin to expand the choices, then select cygrunsrv. |
Windows Tip: If you operate machines connected via a Domain Controller, or a standalone machine with multiple local accounts, login as 'Administrator' (NT/2k/XP) and install Cygwin for current user only. This will hide the shortcuts from the "Users". You can also set the Scheduler (or AT job) to run the batch as 'Administrator' so the "Users" cannot fiddle!
Windows Tip: You will need to tell Windows where to find the Cygwin /bin directory, otherwise apps called from outside Cygwin will fail. Do this by adding C:\Cygwin\bin; to the PATH statement.
On Windows 9.x/ME, add the path statement to the AUTOEXEC.BAT and reboot the machine.
On Windows NT, open the Control Panel and double click on the System applet. Click on the Environment tab. Add the path settings to the end and click the Set button. Click OK, and close the Control Panel. The path will be dynamically reloaded (no need to reboot).
On Windows 2000/XP, open the Control Panel and double click on the System applet. Click on the Advanced tab, then click the Environment Variables button. Double click on the PATH statement in the 'System Variable' screen (lower of the two), add the path on the end, and click OK. Click OK to close the Environment Variables screen, then click OK to close the System Properties dialogue box. The path will be dynamically reloaded (no need to reboot).
Note: If the end of the path looks something like this: C:\Somepath don't forget to add ; before you add the C:\Cygwin\bin; e.g. C:\Somepath;C:\Cygwin\bin;
2: Server
Linux Rsync Server Setup
2.1 Make sure Rsync is installed [rpm -q rsync (Red Hat/Fedora)] on your Linux Server.
2.2 Choose the path for your backup area: This can be on a per-user basis (backup a Users data to their /home/user area) or on a system level basis (a single machine backing up to one directory.)
2.3 Create the /etc/rsyncd.conf and /etc/rsyncd.secrets files. [Check out the Manual pages for rsyncd.conf for more info.]
Here is an example of an rsyncd.conf file where the backup area drops into the user 'Fred's' home drive:
[modulename]
path = /home/fred/backup
comment = Fred's Offsite storage area (requires authentication)
uid = fred
gid = users
read only = false
auth users = fred
secrets file = /etc/rsyncd.secretsThe permissions for this file should be: -rw-r--r-- (644) and root root.
The corresponding rsyncd.secrets file contains the following entry:
fred:BackUpPassword The permissions for this file should be: -rw------- (600) and root root.
Linux Tip: If you are running multiple users, the /etc/rsyncd.secrets file must be contructed with carriage returns after each username:password pair; for example:
vicky:YeahButNoButYeah andy:DontLikeIt harvey:bitty
2.4 Start Rsync in daemon mode.
Linux Tip: Linux Distros usually run rsync from xinetd. You might need to run /usr/sbin/setup (Red Hat/Fedora) and select 'rsync' in the 'System Services'; or you can edit the 'rsync' file in /etc/xinetd.d and set disable = no. Don't forget to restart xinetd afterwards.
Windows Rsync Server Setup
Setting up Rsync as a Server under Windows is a little more tricky, due to the differences in security and paths; and the inability to use the 'authenticate user' mode of Rsync. For this reason, I would not recommend setting up an Rsync Server on Windows for use over the Internet. Keep the installation within a secure Local Area Network. It should also be noted that this method is based on the "Pro" versions of Windows, i.e. Windows 2000 Professional. "Home" version users may experience problems setting up the Service.
Method update: Windows 2003 Server has thrown a spanner in the works. Microsoft have set the paranoid level to maximum which has resulted in Cygwin based services failing to start. This method has been updated to take this into account.
This method comes without warranty, but it should work for: Windows NT 4.0 Server; Windows NT 4.0 Workstation; Windows 2000 Server; Windows 2000 Workstation; Windows XP Workstation.
Method 1. Without installing Cygwin in the full: You might be interested in this Rsync Server project. The Windows package installs the bare essentials to create an Rsync Server.
Method 2. Install Cygwin in full and use its directory structure for storage. (This is recommended if you are new to Linux as the directory permissions are stored *nix style and you will need Cygwin to change them - you cannot change them from Windows!)
Both methods require a valid rsyncd.conf, such as the one below.
Method 2. Step 1: Install Cygwin as in Section 1.
Method 2. Step 2: Choose an area to backup the files to. (In this example I have used /var/rsync_dump in the Cygwin tree.)
Method 2. Step 3: Create the /etc/rsyncd.conf file, as in the example below:
use chroot = false
strict modes = false
[modulename]
path = /cygdrive/c/cygwin/var/rsync_dump
comment = Rsync storage area
read only = falseNote: The path = /cygdrive/c/cygwin/var/rsync_dump looks a little odd. This is Cygwin convention for defining Windows paths from within a *nix emulator.
Method 2. Step 4: If you are setting up on Windows 2003 Server (otherwise skip to the next step):
(1) Open the Windows File Explorer and go to the C: drive.
(2) Right click on the 'Cygwin' directory and select 'Properties'.
(3) Click on the 'Security' tab. The user 'Administrator' should be the first in the list and it will not have any permissions set for this folder.
(If the user 'Administrator' is not listed, you will need to add it.)(4) Tick the 'Allow - Full Control' box in the "Permissions for Administrator" window.
(5) Click the Advanced button and tick the box for "Replace permission entries on all child objects with entries shown here that apply to child objects".
(6) Click the Apply button to set the permissions.
(7) Click the OK button to close the Advanced settings dialogue box.
(8) Click the OK button to close the Cygwin properties dialogue box.
Method 2. Step 5 Install Rsync as a Service from a 'Command Prompt' window with the following command line:
Windows 2003
(All versions & service packs, installed as Administrator)cygrunsrv.exe -I "Rsync" -p /cygdrive/c/cygwin/bin/rsync.exe -a "--config=/cygdrive/c/cygwin/etc/rsyncd.conf --daemon --no-detach" -f "Rsync daemon service" -u Administrator -w password
Note: This is all one line!Windows NT/2k/XP
(All versions & service packs, installed as Administrator)cygrunsrv.exe -I "Rsync" -p /cygdrive/c/cygwin/bin/rsync.exe -a "--config=/cygdrive/c/cygwin/etc/rsyncd.conf --daemon --no-detach" -f "Rsync daemon service"
Note: This is all one line!The section -u Administrator -w password installs the service to run as the user 'Administrator' (where 'password' is the Administrator account password) and is required by Windows 2003 Server, else the service will fail to start correctly. You can create a user called 'rsync' to run the service if you wish to use tighter security. Windows NT/2k/XP users may install the service using this method if needed, else the service will install with SYSTEM priveleges.
Method 2. Final Step From the same command prompt, start the Service with net start rsync.
If all has gone well, you should be ready to accept incoming client connections.
3: Client
In order to backup your Windows machine effectively, I would recommend the use of a batch file, as in the following:
| @cls
@echo off rem Rsync job control file C:\Cygwin\bin\rsync -vrtz --password-file=c:\cygwin\secret --delete /cygdrive/d/Data fred@company.com::modulename |
The example above is for backing up a windows machine to a Linux based Rsync server. If you are backing up a Windows machine to another windows machine, the module section does not include a user name as Windows cannot handle the extra checking; therefore the line would appear as company.com::modulename.
An explanation:
C:\Cygwin\bin\rsync - is the full path to 'rysync.exe'.
-vrtz - verbose (tell us what is being copied), recursive (descend into directories), transfer modification times, z (compress data).
--password-file=c:\cygwin\secret - Path to 'secret' file. (Note: Remember this is for backup to a Linux based Rsync Server; a Windows based Rsync Server cannot authenticate!)
--delete - delete remote files that are deleted locally.
/cygdrive/d/Data - in this example means D:\Data.
fred@company.com::modulename - is the user ID, hostname (can be IP address if over Local Network), and the module connection name (in this example 'modulename').
Windows Tip: We assume you wish to run the backup automatically! In that case, you will have to create the 'secret' file that Rsync uses for its authenticating password. Here is how to do that:
1. Login to Cygwin.
2. Create a file called 'secret' in the root of the Cygwin application (i.e. cd /). Enter the client's password with no spaces and no carriage returns; (in this example: 'BackUpPassword' to match fred:BackUpPassword in the server's /etc/rsyncd.secrets file). Assign the file 600 permissions (chmod 600 secret). This is the file '--password-file=c:\cygwin\secret' as referred to above. If you create the secret file as a user (i.e. not logged in as 'Administrator'), you will need to change the ownership of the file: chown Administrator:Domain Users should work for Servers; chown Administrator:SYSTEM should work for Workstations.
Please note: If you cannot change the persmissions on the secret file, check you are running your NT/2k/XP set-up with NTFS and not the FAT file system.
3. Exit Cygwin.
Windows Tip: You may call this batch file from the Startup Group, the Scheduler (and AT scheduler), or from the Logon / Logoff features of the Group Policy (Win2k/XP) by running gpedit.msc.
External Links
Page updated: 15th August 2021